How To Build A Timber Deck
With a little planning and effort, you'll be enjoying al fresco dining and relaxing in your custom-built oasis in no time!

Constructing a timber deck in your garden can be a rewarding DIY project, providing an attractive and functional outdoor living space. This guide will walk you through the essential steps.

Step 1: Prepare The Site
Begin by thoroughly clearing the chosen area in your garden. Remove any existing vegetation, debris, or obstacles. Once clear, accurately measure the length and width of the desired deck area. This will be the footprint of your deck.
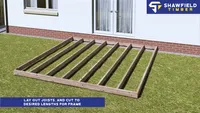
Step 2: Lay Out Joists and Cut to Desired Lengths for Frame
Using your measurements, lay out the timber joists on a flat, level surface to form the outer frame of your deck. Cut the joists to the exact lengths required using a saw. These will form the perimeter of your deck.
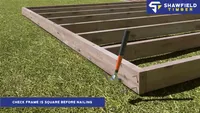
Step 3: Check the Frame is Square Before Nailing
Once all frame pieces are cut, assemble them loosely. Before nailing or screwing them together, meticulously check that the frame is perfectly square. Use a large set square or measure the diagonals of the rectangle – if the diagonal measurements are equal, your frame is square. This is a critical step for a professional-looking deck. Once satisfied, securely nail or screw the frame pieces together using appropriate timber screws.
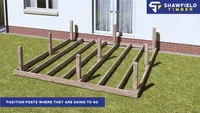
Step 4: Position Frame and Plot Post Holes
Carefully position the assembled deck frame in its final desired location. Once happy with its placement, mark the ground precisely where each support post will be located. Typically, posts are needed at each corner and at regular intervals along the longer sides of the frame, depending on the span and timber size.

Step 5: Dig Holes and Insert Posts
Using a spade or post-hole digger, dig the post holes to a depth of around 300mm. Ensure the holes are wide enough to allow for concrete post mix. Insert the timber posts into the holes that have been dug.
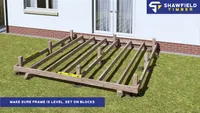
Step 6: Level Frame on Blocks
With the posts in the holes, carefully rest the deck frame on top of temporary support blocks or bricks around the perimeter. Use a long spirit level to ensure the entire frame is perfectly level in all directions. Adjust the height of the blocks as needed.
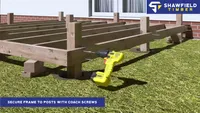
Step 7: Secure Frame to Posts Using Coach Screws
Once the frame is level, secure it firmly to the top of each timber post using heavy-duty coach screws. Predrill pilot holes to prevent splitting the timber. Ensure a strong and secure connection, as this forms the primary support for your deck.
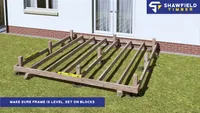
Step 8: Slide Support Joists Under Frame, Raise and Fix to Posts and Frame
Now, slide the support joists underneath the secured frame. Position them at consistent intervals (e.g., 400-600mm centers, depending on your deck board thickness). Raise these joists to the underside of the main frame and securely fix them in place by screwing directly into the main frame and posts where they meet.

Step 9: Put Postmix in Holes with Posts, Add Water as Instructions on Bag
With the frame and internal joists firmly in place and level, it's time to secure the posts permanently. Pour the concrete post mix into the holes around each post, following the instructions on the bag. Typically, you'll add water to the mix in the hole itself and allow it to set. Ensure the posts remain plumb (vertically straight) as the concrete sets.

Step 10: Once Postmix Has Set, Cut the Excess from the Posts
Allow the post mix to cure fully according to the manufacturer's instructions. Once it has hardened, use a saw to carefully cut off any excess timber from the top of the posts, so they are flush with the top of your deck frame.
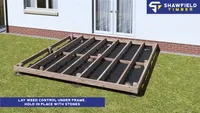
Step 11: Lay Weed Control Mat, Weigh Down with Stones
To prevent weed growth under your deck, lay a durable weed control mat across the entire area within the deck frame. Overlap the edges and weigh it down with stones or bricks to keep it in place. This will save you future maintenance headaches.
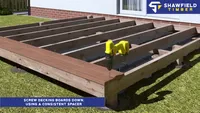
Step 12: Screw Deck Boards into Position, Use a Consistent Spacer in Between the Boards to Allow Expansion and Contraction
Finally, begin laying your deck boards. Start at one end of the frame. Predrill pilot holes for your screws to prevent splitting the timber. Screw the deck boards securely to the internal joists, ensuring each board is firmly attached. Crucially, use a consistent spacer (e.g., a 5mm offcut of timber or a purpose-made deck board spacer) between each board. This gap is essential to allow for the natural expansion and contraction of the timber due to changes in temperature and moisture, preventing warping and buckling. Continue until all deck boards are laid, cutting the last board to size if necessary.

Step 13: (Optional) Stain Decking and Apply Fascia
For a finished look, apply extra decking boards to the sides of the frame and stain your deck to the colour of your choice.
Ready to get started?
Use our Decking Calculator to work out everything you need instantly.